Saturday, June 23, 2012

Bloop Scarf Tips


Width: if you are getting near the end (e.g. there are very few markers left), and the scarf seems too narrow, start adding extra plain rows between the bloop rows. They will blend in with the rest of the scarf because of the flow of the design.

If you still have a lot of markers left but the scarf seems to be getting too wide, start doing two bloops in each row, not next to each other, and don’t use any plain rows between the bloop rows.

Similarly, the flow of the design will make this just seem part of the pattern.


Markers: Because you are slipping the markers, it helps to have a tail of yarn on them, which ends up being woven in and out as you knit back and forth. This tail will keep the marker from jumping off the needle as you move it or slip it.

Also, if you find you have trouble remembering which marker is the SM and which is the MM, you could use a small clip, broken-ring marker, or even an extra and distinctive second marker on one of them to remind you which it is, but just remember to do it consistently for each bloop (write it down, if you need to), so it helps you instead of confuses you more.

This pattern describes the way I use markers to make my bloops, but if you think of a method that makes more sense to you, then go for it!

Here are some pictures of markers with tails and how to add the tail:


Memory Helpers


Stationary Marker (SM)

  • You are always slipping it, not taking it off.
  • It is always closer to the end of the scarf than the MM
  • You are always knitting past it and wrapping into the previous color

Movable Marker (MM)

  • You are always taking it off, wrapping and turning, and knitting one or two stitches before replacing it
  • It is always closer to the beginning of the scarf than the SM
  • You are always knitting and wrapping into the same yarn you are knitting with


Wednesday, June 20, 2012

Bloop Scarf Pattern


I use size 13 needles and cast on 104 stitches, because I like the open look—if you use a smaller needle or like short scarves, adjust your length accordingly. (However, it’s a scarf, so no matter what the length, someone will like it.)

  • Cast on 4 stitches, place marker, then place a marker after every 8 stitches 12 times (you have 100 stitches at this point), place a marker, cast on 4 stitches, and that’s the end.
  • Turn and knit back to start.

The easiest way to knit this scarf is:

  • Start with the First Bit Bloop (see below)
  • After that bloop, continue knitting across the entire scarf and then turn and knit back (finishing first garter ridge)
  • Change color, knit to the first marker and do a regular bloop
  • Finish knitting across and back
  • Change color and make a bloop at the next marker, and continue in this fashion until you complete the Last Bit Bloop (you are always knitting to the first remaining marker to do your bloop, then knitting across and then back--you are removing the marker for the one bloop in each ridge, so you should always be starting a bloop a little past the last one)
  • What makes this method easy is that you will never need a temporary marker, and it should always be easy to know which side you started from (the side with fewer markers)

But who needs easy? Okay, all of us, but here's how I like to do it more often:

  • I make two bloops which aren't near each other in each ridge, making it somewhat random
  • I like to knit a plain row between the bloop rows – and sometimes two plain rows – and sometimes I use a row of yarn-overs
  • Don’t forget to do the First Bit Bloop (which doesn't have a marker to remind you, so you just have to remember)
With either method, when all of the markers have been removed and you've knit back to the beginning, change the color for the last time and bind off.


How to Knit a Bloop:

(See the Notes if you don’t know how to wrap and turn.)

(I keep the 1, 2, 1, bloop in the pattern just to show you how it works, but you could change the directions to read, knit 1, then on the next row, knit 3, then on the next row, knit 4, if you want.)

  • Knit to the marker where you want to start a bloop. This is your **moveable marker** (MM) 
  • (Row 1) Knit 8 stitches to next marker. This is your **stationary marker**  (SM) (if no marker is there because you removed it earlier, add one—I find it helps to use one that is very different from the others, to remind me it is only temporary)
  • (2) Slip SM, wrap and turn, knit back to MM
  • (3) Take off MM, wrap and turn, knit 1, replace MM, knit to SM
  • Slip SM, knit 1
  • (4) Wrap and turn, knit past SM back to MM
  • (5) Take off MM, wrap and turn, knit 2, replace MM, knit to SM
  • Slip SM, knit 1, knit 2
  • (6) wrap and turn, knit past SM back to MM
  • (7) Take off MM, wrap and turn, knit 1, replace MM, knit to SM
  • Slip SM, knit 1, knit 2, knit 1
  • (8) Wrap and turn, knit past SM back to MM
  • Take MM off entirely and put aside, wrap and turn, knit past MM [removing it if you put a temporary marker there] to next place you want to bloop, or to end of row

End of bloop

Here's the same thing in diagram form:


  • [knit to another marker and repeat bloop if desired]
  • At the end of the row, turn and knit all the way back to the beginning, then change color.

For First and Last Bits – these are only partial bloops

First Bit Bloop – for the beginning 4-stitch area: 

  • Knit 4 to first SM [place temporary SM if needed], slip SM, wrap and turn, knit back to start. 
  • Knit to SM, slip SM, knit 1, wrap and turn, knit back to start.
  • Knit to SM, slip SM, knit 1, knit 2, wrap and turn, knit back to start.
  • Knit to SM, slip SM, knit 1, knit 2, knit 1, wrap and turn, knit back to start.
  • Knit to the next place you want to do a bloop, or to the end of the row, and then knit back to the beginning.
  • [If you had to use a temporary SM, take it off as you go past.]


Last Bit Bloop – for the ending 4-stitch area:

  • From the final marker, which is the MM, knit 4 stitches to the end
  • Turn and knit back to MM
  • Take off MM, wrap and turn, knit 1, replace MM, knit 3 stitches to end
  • Turn and knit back to MM
  • Take off MM, wrap and turn, knit 2, replace MM, knit 1 stitch to end
  • Turn and knit back to MM
  • Take off MM and put aside, wrap and turn, knit 1 to end
  • Knit back to the beginning


Notes
Wrap and turn: slip the next stitch, bring the yarn between the needles to the front, turn the knitting so you are knitting back the way you came, slip the stitch back and continue knitting.

What you have done is slip the yarn around the next stitch like a tiny lasso, and turned the knitting around so you are knitting in the other direction. This keeps a hole from forming where you turn. It helps if you make sure your lasso isn’t too tight, so the stitches keep the proper distance from each other.

There are other ways to prevent a hole, so use your favorite, but this method works for me for bloop knitting.

Next post: hints and tricks for this pattern and bloop knitting in general.

Sunday, June 17, 2012

I Came Back for the Bloops

I've been having so much fun that I decided to restart this blog.


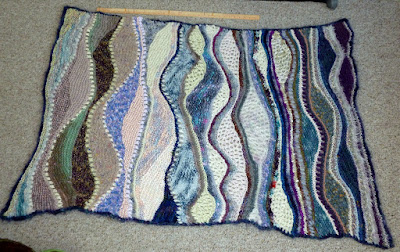
This is my version of short row knitting. My sister-in-law calls the short-row sections 'bloops,' so I've come to think of this as bloop knitting.

It isn't the same as Swing Knitting -- this is a simplified version of doing short rows, and I handle the marking very differently -- but I suppose you could say they are all part of the same short-row family.

The basic idea of bloops is to keep the number of rows the same, even when using short rows. When I made Slice of Jupiter several years ago, I didn't try to be perfect in my short rows, and just guessed at keeping the number of rows even.


Another foray into short rows was Organic Triangle, where again I wasn't systematic.


And yet, such is the forgiving nature of knitting, both of these worked well enough.

However, now it's time to get serious.

If you have blocks of color and some plain rows, a schematic of your knitting might look like this.


Short-rows take the same pattern, and simply slide it over a bit.


Note that in any given column of stitches, you still have the same number of rows.


And that is the theory, because if each column has the same number of rows, you will end up with a rectangle.

And once you have a rectangle, well, then......you can play.