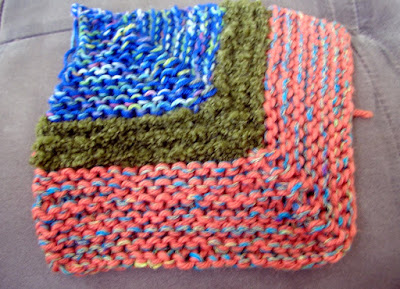
Here is my colorway, chosen because it had a large skein of one color (the green in the upper left).
The green will be the background color. It's variegated in shade, to add some complexity.
I decided to make the front squares in oranges, so they will pop out visually. That means the back blocks will be purple/blues. Each orange and purple/blue section will use two yarns, just to mix them up.
There are some other greens in the colorway, but I'm not sure I'll end up using them. Maybe they will show up in the edging? We'll have to wait and see.
Here is the beginning.
Yes, it's a simple, standard modular block.
On size 10 needles, I cast on 20, placed a marker (A), then cast on 21. Then I knit back. (This will all be in garter, to keep the proportions.) Then each time I got to A on the front side, I decreased on either side (in my case, slip the stitch before the marker, let the marker hang, put the stitch back on the left needle, put the marker on the right needle, then do a double decrease and continue. Then I knit back without shaping.
I did this for 7 ridges in orange, changed to the background green for 3 ridges, and then finished in the purple/blue until all the stiches were gone.
Here is the rest of the first segment.
Here is how I did it.
(NOTE: I changed how I did the outer green a bit on subsequent segments because I found a better way to do it. I'm explaining the 'better way' here, so pay no attention to the fact that some of the green ridges look like they go the wrong way from my description.)
(These numbers are in grey) I picked up 20 stitches along the top, placed a marker, picked up 21 more stitches down the side. This time on each front side at A, I increased one stitch just in front of the marker, and increased another one after the stitch following the marker. (This keeps the same center stitch, with the marker always in front of it.) I knitted 7 ridges in orange.
(These numbers are in yellow.) Then I cut the orange, and on the next row I knit the first 10 stitches in green, and the rest until the marker in blue. I turned the corner and continued to knit until I was 10 stitches from the edge, and then I turned and knit back, keeping the colors the same and leaving those final 10 stitches unknit. I still increased at A on the right side. I knit 8 ridges like this.
(These numbers are in light blue.) I cut the blue, but not the green, and then cast on 5 stitches in the green, and then knit back, knitting the fifth stitch together with one on the needle, turned and knit the 5 stitches back. I continued in this way, eating up one of the previous stitches each time, until I got to the marker. I then cast on another 5 stitches, and followed the same pattern of knitting two together at the fifth stitch, turned and knit back. (The part after the marker is the green section going down the left edge of the piece.)
When I got to the edge of the blue, I knit down the side of the blue section, picking up 8 stitches along the edge of the blue, and then knitting that 8th stitch together with one of the bottom orange ones, then I turned and knit back. There were now 13 stitches on the needle, from the original 5 and the 8 newly picked up ones. I continued in the same way on these 13 stitches for 10 ridges, which ended the orange stitches to eat up, and then cast off.
Ta-daaa!
Subscribe to:
Post Comments (Atom)


No comments:
Post a Comment