Sunday, April 14, 2013
Exploring Hairpin Possibilities
I'm doing what I usually do with new techniques: working on a project that lets me play with possibilities.
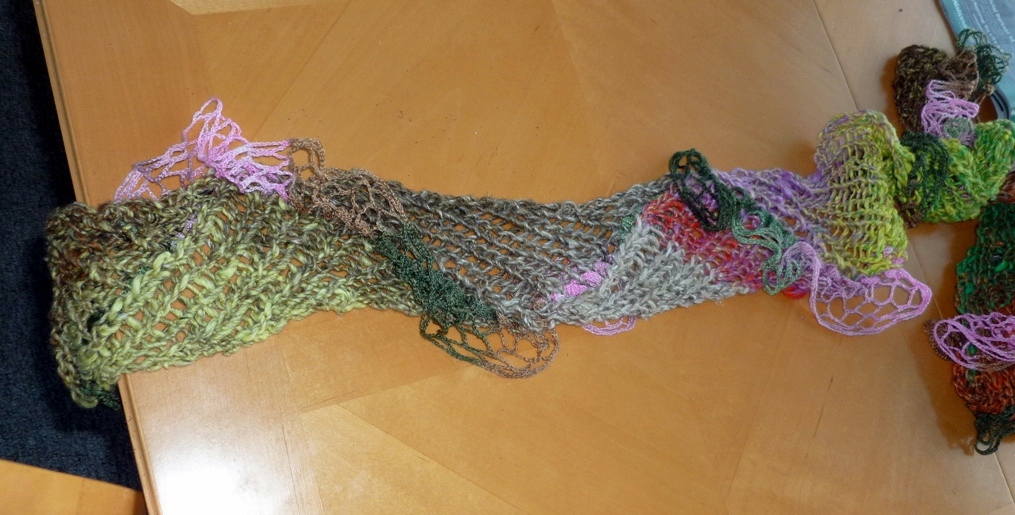
The idea is to create a triangular shawl made of vertical strips of hairpin lace. I'm not very far along yet, though.
I have more greens than any other yarn color by far, so I'm trying to use some of them up. (It isn't my favorite color, just by chance and the fact that I ran across great green yarns.)
The general idea is to make the hairpin lace strips in various greens, varying the design of each strip, and joining them with contrast yarns that go from a lighter range to a darker range as I move across the shawl. I'm thinking of letting the yarn ends hang down for a bit of chaos. Here are the contrast yarns threaded onto a circular needle to keep the sequence straight.
I'm getting inspiration for the variations in the strips from this magazine, with I got off of Etsy.
No, I don't read Russian, but I got over my fear of foreign craft magazines during my intense lace phase, when I lived for German patterns, with the occasional Spanish and Japanese one thrown in. One can always understand charts with a bit of decoding.
Also, I couldn't find anything about hairpin lace in English that went beyond the basics, whereas this has pages of variations I could try. (Hey, Beadwrangler, hurry up with your book!)
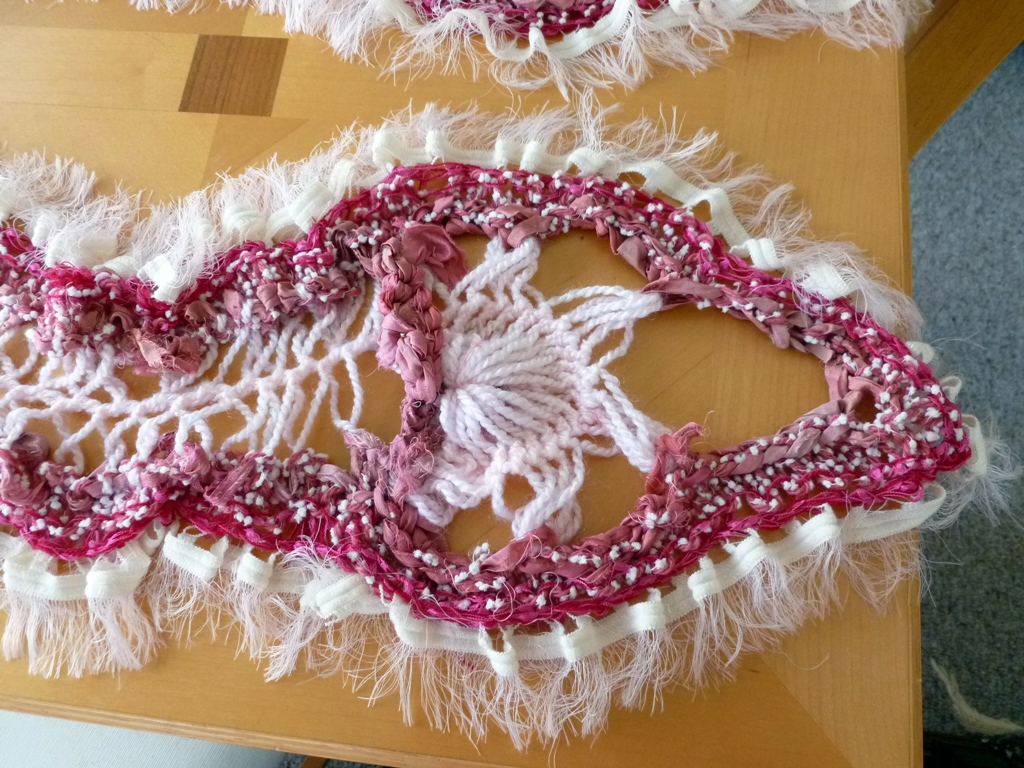
Here are some close-ups of the tiny bit I've finished.
I'm also varying the widths, which will be more apparent when this is finished and blocked. Here's the strip I'm working on now.
I'm doing the usual hairpin hook (simple hairpin stitch), chaining three and then hooking under the entire loop before turning. Here's a close-up.
I've found that I can't just count loops to see if strips match up because of the different yarn weights, so I just guess by stretching it out on the hairpin against the previous strip. I've had to undo some loops and make more on others, and I quickly learned to make the end (the final part where you cast off) point down (not be the top of the shawl) to make length adjustments easier.
Also like usual, I hated it at first and was tempted to unravel it, but now I'm starting to like it. So the adventure will continue.
Tuesday, April 2, 2013
Rust and Greens
This one was a special request from one of my sisters-in-law. I haven't heard if she likes it yet.
This was a standard bloop pattern, although I went back to my original version where I made bloops in both directions, using different colored markers for each direction. At around the middle I'd finished both patterns (e.g., all the markers were removed), so I reversed the pattern.
To begin with, I used large beige markers for the front with a repeat of 8 stitches and a pattern of 2-3-1-2. For the back, I used small pink markers with a repeat of 12 stitches and a pattern of 1-2-3-4.
Here are some closer looks.
Tuesday, March 12, 2013
Two Updates
I forgot that I had a couple of photos on my phone of the start of the tube scarf.
Here is how the tube yarn looked as I was knotting it.
And here it is as I was picking up the first row of stitches.
As a reminder, here is the finished project. The red in my phone photos is actually closer to the true color than the more orangish look from my camera.
And I visited what is currently my favorite local yarn store--The Knitting Patch. I've always said that I want to retire near a fabulous yarn store and a Trader Joe's. Now that I've discovered this store, all I need is the food....and the ability to retire.....details, details.
The store has a truly inspiring array of yarns, including the new edging and fabric ones, and the yarn is beautifully and enticingly arrayed. There are lots of samples, too, which helped sell me on some of the new frill yarns.
I made one of the scarves in How To Use A Frill from some yarns i bought during my first visit to The Knitting Patch. On this last visit, i brought it in to show the enthusiastic owner, who immediately got her husband to take some great pictures of it.
Wow, so much more beautiful than my amateur photos!
And yes, I brought home some more exciting yarns. Did you even need to ask?
Wednesday, March 6, 2013
Taming a Tube
I've been wanting to use one of those tube yarns as the middle of a start-from-the-center scarf. The problem is, they are so wide--wide enough to use as a sleeve.
Then I noticed the knot at the end, which sparked this solution.
What I did was knot the yarn at intervals, and then create chains between each segment to pick up to create the scarf.
I then had fun with the edging, throwing in some fancy and fringy yarns.
It looks very dramatic, and you really can't go wrong with fringe!
Sunday, March 3, 2013
I Heart Scarves
This is my most ambitious hairpin lace scarf to date.
It was created for Valentine's Day, and I displayed it in my office, although I finally got around to blocking it only yesterday.
The inspiration was from something on Pinterest, although the page didn't link to any directions, only to the picture.
So I tried to backward-engineer it. Here is the result, one from each end, which differ because I used a color-changing yarn called Candy Cane.
Not too bad, but as you can see, I made the point too large.
The other challenge I set myself was making the hearts organic to the rest of the scarf, so it was all one long piece, and so the hearts would be the correct colors. This also worked out pretty well, although I'm not completely thrilled.
Here are some close-ups of the middle, so you can see how the hairpin lace was edged in some fancy yarns.
All in all, well enough, and I learned more about hairpin lace motifs.
(And it does look like a Valentine's confection!)
Wednesday, February 27, 2013
Hairpin Lace in Scarves -- The Goldilocks Effect
I've been experimenting with using hairpin lace as the middle of start-in-the-middle scarves.
Hairpin lace wasn't a craft I was familiar with, so I found directions for how to create it online. For the first attempt, I used one of my magic balls, and the result came out too short for a scarf.
It might be long enough for a neck gaiter, perhaps, but it now has a better use.
I did a simple row or two of knitting around the edges before binding off. This worked, but made the edge seem tighter than the middle.
For my next attempt, I used some thick silk yarn, and kept adding loops until no more would fit on the loom. I'll bet you can guess what happened.
That's it at the top. It doesn't looks so bad, does it? Well, what you aren't seeing is that the length had to be folded back on itself, so it had to be doubled to shorten it to a reasonable length for a scarf.
Even doubled, it makes a long scarf. Still, it did come out looking nice, and this time I accommodated the stretchiness by putting a yarnover between each loop when I added the knitting around the edges. That's the next lesson learned: thick yarns make a stretchy length.
For my third try, I used a ribbony yarn, one of those made from pieces left over from saris from Darn Good Yarn. This one came out just right.
Again I added the yarnover between each loop, and twisted each loop before knitting it up along the edge.
As you can see, I knit several rows around, one of them all yarnovers, and used some fluffy yarn to set off the materials.
I treated the ends like other start-in-the-middle scarves, picking up extra stitches and creating either squared-off ends or rounded ends.
So: too short, too long, just right. My next attempt was for a scarf with heart patterns at each end, for Valentine's Day. That was another adventure!
Hairpin lace wasn't a craft I was familiar with, so I found directions for how to create it online. For the first attempt, I used one of my magic balls, and the result came out too short for a scarf.
I did a simple row or two of knitting around the edges before binding off. This worked, but made the edge seem tighter than the middle.
For my next attempt, I used some thick silk yarn, and kept adding loops until no more would fit on the loom. I'll bet you can guess what happened.
That's it at the top. It doesn't looks so bad, does it? Well, what you aren't seeing is that the length had to be folded back on itself, so it had to be doubled to shorten it to a reasonable length for a scarf.
Even doubled, it makes a long scarf. Still, it did come out looking nice, and this time I accommodated the stretchiness by putting a yarnover between each loop when I added the knitting around the edges. That's the next lesson learned: thick yarns make a stretchy length.
For my third try, I used a ribbony yarn, one of those made from pieces left over from saris from Darn Good Yarn. This one came out just right.
Again I added the yarnover between each loop, and twisted each loop before knitting it up along the edge.
As you can see, I knit several rows around, one of them all yarnovers, and used some fluffy yarn to set off the materials.
I treated the ends like other start-in-the-middle scarves, picking up extra stitches and creating either squared-off ends or rounded ends.
So: too short, too long, just right. My next attempt was for a scarf with heart patterns at each end, for Valentine's Day. That was another adventure!
Thursday, February 21, 2013
How to Use a Frill
About the only thing you see the frilly yarns used for are the scarves that are all frill. But those yarns are so full of possibilities!
Here are some other uses.
1. Beginnings
Easiest cast-on in the book: just pick up along the frill. Casting off is a bit harder, but not difficult. What I usually do is cast off with another yarn, picking up a bit of the frilly yarn in each stitch cast off.
2. Down the Middle
The pink one is a bit of fun, frilly and shiny and lacy. I did one of the frilly yarns down the middle, one ridge forward and back. This gives a lovely frill down the middle on both sides.
Here are a few closer looks.
I really like this one!
The brown one uses the frilly yarn as the center section. I laid the frill yarn out, had it do a U-turn and then joined it down the middle to get the width, and then I knit around and around, and finished with the same frill yarn.
3. Round and Round
This is based on Kim Salazar's Kureopatora scarf, which is one of my go-to patterns. In between each section I knit one row of a frilly yarn (so the frill was on one side), and then started the next section. This makes the frill wrap around the scarf.
It's difficult to get a good picture of the effect, so I tried to show it with the lines below.

Here is a blue version, maybe you can see the wraparound here, too.
It's a start. I think there are still more things to discover.
Here are some other uses.
The brown one uses the frilly yarn as the center section. I laid the frill yarn out, had it do a U-turn and then joined it down the middle to get the width, and then I knit around and around, and finished with the same frill yarn.
It's difficult to get a good picture of the effect, so I tried to show it with the lines below.
Subscribe to:
Posts (Atom)